
Due to the nature of my work and to my penchant for
traveling and visiting new places, I am frequently riding the plane. And for
this, I have learned the “secrets” and “techniques” for booking airline tickets
without paying so much, without paying for the services that you do not really
need. In this post, I am using as illustration, the booking process using the
Cebu Pacific website.
Step 1. Choose the Origin and Destination by
pointing your mouse to the drop-down arrow (red circle). Note however that some
destinations (airports) are near your original destination, so you have to be
familiar with geography. (For example, if you want to go to Boracay, it can be
reached via Caticlan or Kalibo).

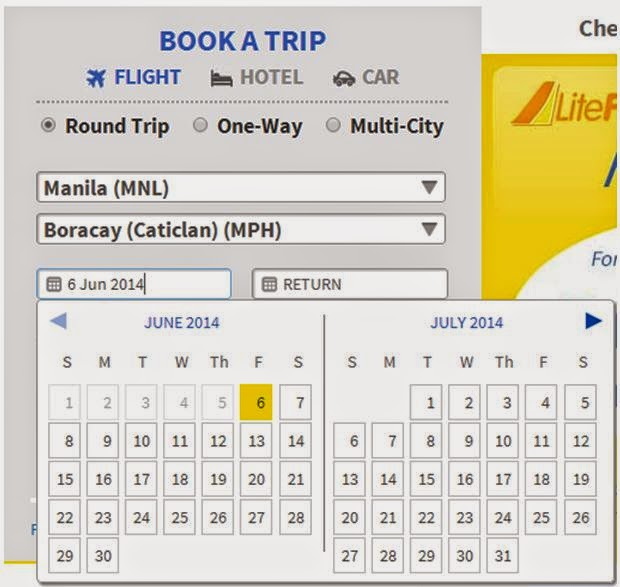
Step 2. Choose the date of departure and return. Tick the One-way option if you want no return ticket.
Step 3. Fill out the Adults and Children category
for the number of passengers, then click FIND
IT!

Step 4. Tick your flight option. Promo Fares and
Year-Round Fares are in separate columns. Remember that Promo Fares are
non-refundable and pretty much “irrevocable”. Meaning, you cannot change this
booking or if you can rebook, it is with a fee which is, usually, you end up
paying way much higher than the Promo fare. So be sure of the date and time of your
travel.


Step 5. Then click the Continue button.
Step 6. Now, fill up the guest details. Now,
if you have a CEB CLUB membership, it would be easier as your details are saved
already.

Step 7. Now this is where you should be careful
with, as this is the portion where you opt to pay for services you do not really
need. See, most airlines already choose by default one option. In this case,
10kg baggage is by default chosen, automatically adding up Php 180 to your
bill. The technique here is to remove that, by clicking the drop down button
and choosing the No baggage (if you are a lite traveler) option. Now if you
have baggage, remember that buying baggage allowance online is way much cheaper
than buying at the airport, believe me, you will get the surprise of your life!
When in the web it is Php 180 per 10kg, at the airport, reinstating baggage
allowance would be around Php 300 (not sure) and excess baggage is Php 200 per
kg (not updated). Then click CONTINUE.

Step 8. Reserve Seat. Now this is another payment
which you can avoid actually. Airlines again put you in a default seat, which
requires you to pay Php 130 (Cebu Pacific rate). Why pay for a seat when you
already paid for your fare, right? Well, this is really if you want to choose
the seat location (aisle, window, near doors, etc.). But when you check-in at
the airport, you can request the check-in crew for an aisle or a window seat
(they usually ask you, though).
Remove the reserve seat by pointing your mouse at
the Seat portion (red circle), then the “remove seat” option will show. Then
click the vague “remove seat” option (blue circle).

As I said, you ca also choose seats upon check-in
at the airport. For other airlines, say AirAsia, there are usually two counters
open for each flight. These counters are already assigned with “front (rows
1-15)” or “back (rows 16-31),” so you may ask first or you may request the
crew. There is no harm in asking. However, recently, there is another option
where there are self-service check-in kiosk where passengers check-in
themselves. On how to operate this, just follow the instructions appearing on
the touch screen. There are always staff around who are willing to help or
since we Filipinos are helpful, you can ask around fellow passengers. At the
kiosk, seats are randomly chosen, but there is an option to choose if you do
not like the seat initially assigned randomly to you. It is better to come to
the airport earlier so that more seat options will be available. Remember, at
most airbus, seats A and F are window seats, B and E are middle, and C and D
are aisle seats. Rows 15 and 16 will provide you a view of the wings so you
might opt for Rows 1-5 and 25-31 to be near the doors and unobstructed views.

Step 9. Click Continue. Next stop is the Travel
insurance option. As for me, if I am in a domestic flight, I do not usually
purchase insurance. Normally, again, the airline has preselected the insurance
option (another Php 325) but there is again a VAGUE option to remove this, just
click the No Thanks (can you see it? Circled in red!).

Step 10. Click Continue after ticking that you have
reviewed the booking summary. Reminder: it is in this part that you have to
finally check everything: date, time, origin, destination, names of passengers.
Step 11. Payment processing. This is where you
process payment whether via credit card, payment centers, travel fund, debit
cards, etc.
See how we saved around Php 700 because we clicked
the vague “no thanks” option for the baggage, seat and insurance? What if after
having your itinerary, you suddenly realized that you needed those add-ons?
Fret not, as you can still purchase seats, baggage, insurance and other add-ons
through the “Manage Booking” option.
For other airlines, pretty much the same process is
followed. Tip is just to read and have patience as this might cost you a few
pesos. Have a safe trip and I hope you learned from this post.
Meet the World,
~S
No comments:
Post a Comment